
In today’s world, technology has made it possible to build and create anything you can imagine. With the help of advanced tools and technologies, we were able to build a basic game and beat it with superhuman performance using ChatGPT and Github Copilot.
Our game is a simple one, where the player has to click on a green box that appears on the screen. The game becomes increasingly challenging as more and more randomly colored boxes appear and move across the screen, making it harder for the player to find the green box. We don’t put any restrictions on the moving boxes in terms of color.
The prompt we used to generate the game scaffolding was:
Build a JavaScript game that has a green box that you need to click to gain points. There should be a bunch of randomly colored boxes that aren’t green appearing and moving across the screen.
Which produced:
// Create the canvas element
const canvas = document.createElement('canvas');
canvas.width = window.innerWidth;
canvas.height = window.innerHeight;
document.body.appendChild(canvas);

// Get the canvas context
const ctx = canvas.getContext('2d');

// Set the initial score
let score = 0;

// Create the green box object
const greenBox = {
  x: Math.random() * canvas.width,
  y: Math.random() * canvas.height,
  width: 50,
  height: 50,
  color: 'green',
};

// Create an array to store the randomly colored boxes
const boxes = [];

// Function to create a new randomly colored box
function createBox() {
  const box = {
    x: Math.random() * canvas.width,
    y: Math.random() * canvas.height,
    width: 50,
    height: 50,
    color: `rgb(${Math.random() * 255}, ${Math.random() * 255}, ${Math.random() * 255})`,
    xVelocity: Math.random() * 2 - 1,
    yVelocity: Math.random() * 2 - 1,
  };
  boxes.push(box);
}

// Create some initial boxes
for (let i = 0; i < 10; i++) {
  createBox();
}

// Function to draw the boxes on the canvas
function drawBoxes() {
  ctx.clearRect(0, 0, canvas.width, canvas.height);
  ctx.fillStyle = greenBox.color;
  ctx.fillRect(greenBox.x, greenBox.y, greenBox.width, greenBox.height);
  boxes.forEach((box) => {
    ctx.fillStyle = box.color;
    ctx.fillRect(box.x, box.y, box.width, box.height);
  });
}

// Function to update the position of the boxes
function updateBoxes() {
  boxes.forEach((box) => {
    box.x += box.xVelocity;
    box.y += box.yVelocity;

    // Check for collision with edges of canvas
    if (box.x + box.width > canvas.width || box.x < 0) {
      box.xVelocity = -box.xVelocity;
    }
    if (box.y + box.height > canvas.height || box.y < 0) {
      box.yVelocity = -box.yVelocity;
    }
  });
}

// Event listener to handle clicks on the canvas
canvas.addEventListener('click', (event) => {
  // Check if the click was on the green box
  if (event.clientX > greenBox.x && event.clientX < greenBox.x + greenBox.width &&
    event.clientY > greenBox.y && event.clientY < greenBox.y + greenBox.height) {
    score++;
    greenBox.x = Math.random() * canvas.width;
    greenBox.y = Math.random() * canvas.height;
  }
});

// Function to animate the game
function animate() {
  drawBoxes();
Note: The code abruptly stops, which occasionally happens with ChatGPT.
We then added a start function with Github Copilot to call the animate function and make sure the green box doesn’t start off screen. At that point, we needed a HTML file to call the JavaScript, so we asked ChatGPT to make one!
Create a html file that calls the start method in index.js
Which produced this great response:
Here’s an example of an HTML file that calls the animate function in index.js:
<!DOCTYPE html>
<html>
  <head>
    <title>My JavaScript Game</title>
  </head>
  <body>
    <script src="index.js"></script>
    <script>
      animate();
    </script>
  </body>
</html>
It is important to note that the animate function should be called in a loop to make it look like it is animating. So you can use requestAnimationFrame to achieve that.
// Function to animate the game
function animate() {
  drawBoxes();
  updateBoxes();
  requestAnimationFrame(animate);
}
You can also write a function to change the number of boxes on the screen, to make it harder or easier as the score increase.
function createNewBoxes(){
  if(score < 10){
    for (let i = 0; i < 10; i++) {
      createBox();
    }
  } else if (score > 10 && score < 20) {
    for (let i = 0; i < 20; i++) {
      createBox();
    }
  } else {
    for (let i = 0; i < 30; i++) {
      createBox();
    }
  }
}
Then you can call this function every time you update the score.
canvas.addEventListener('click', (event) => {
  // Check if the click was on the green box
  if (event.clientX > greenBox.x && event.clientX < greenBox.x + greenBox.width &&
    event.clientY > greenBox.y && event.clientY < greenBox.y + greenBox.height) {
    score++;
    createNewBoxes();
    greenBox.x = Math.random() * canvas.width;
    greenBox.y = Math.random() * canvas.height;
  }
});
This is just a basic example, you can add more features such as sound effects, different level, different green box size, more complex collision detection, and so on.
After some tweaking, we decided to make the score move around the screen to stop the AI from trying to click on it, though it’s unlikely the AI duo wouldn’t be able to figure out how to ignore it.
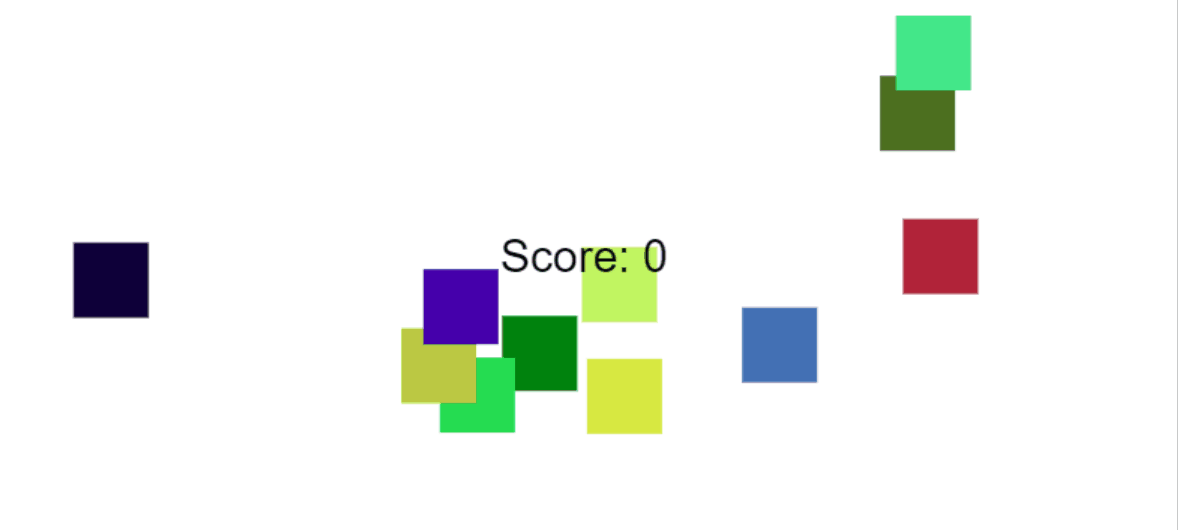
Here’s a preview of what the game looked like:
The final game code can be found here: https://github.com/Copilot-User/chatgpt-and-copilot-build-a-game/tree/main/game
Now on to the AI, which is what really sets this project apart. With the help of ChatGPT and Github Copilot, we were able to develop an AI that uses Python and OpenCV to continuously capture the screen, find the stationary box among the moving boxes, and click on it with superhuman precision and speed.
The process of building the player was relatively simple. We first used ChatGPT to generate the code for the AI. Then, with the help of Github Copilot, we were able to put the finishing touches on it and iron out some of the kinks in ChatGPT’s code. The prompt we used for the scaffolding from ChatGPT was as follows:
Create an AI using Python and OpenCV that continuously captures the screen and finds the stationary box among slow moving boxes. Once it is confident it has found the box, it should click on it.
At which point it gave us this to work with:
import cv2
import numpy as np
import pyautogui
import time

# Set the threshold for the non-white color
lower_bound = np.array([1,1,1])
upper_bound = np.array([254,254,254])

# Create a list to store the positions of the candidate boxes
candidate_boxes = []

# Create a variable to store the count of same position
same_position_count = 0

while True:
    # Capture the screen using OpenCV
    screen = cv2.cvtColor(np.array(pyautogui.screenshot()), cv2.COLOR_BGR2RGB)

    # Threshold the screen to only select non-white color
    mask = cv2.inRange(screen, lower_bound, upper_bound)

    # Find the contours of the non-white color in the image
    _, contours, _ = cv2.findContours(mask, cv2.RETR_TREE, cv2.CHAIN_APPROX_SIMPLE)

    for contour in contours:
        # Find the center of the contour
        M = cv2.moments(contour)
        cX = int(M["m10"] / M["m00"])
        cY = int(M["m01"] / M["m00"])

        # Check if the contour is already in the list of candidate boxes
        found = False
        for i, candidate in enumerate(candidate_boxes):
            if abs(candidate[0] - cX) <= 5 and abs(candidate[1] - cY) <= 5:
                found = True
                candidate_boxes[i] = (cX, cY, candidate[2] + 1)
                break

        if not found:
            candidate_boxes.append((cX, cY, 1))

    # Find the candidate box that has been in the same position for the longest time
    max_count = 0
    stationary_box = None
    for candidate in candidate_boxes:
        if candidate[2] > max_count:
            max_count = candidate[2]
            stationary_box = candidate

    # Click on the center of the stationary box if it has been in the same position for at least 30 frames
    if max_count >= 30:
        pyautogui.click(stationary_box[0], stationary_box[1])

    # Sleep for some time
    time.sleep(0.5)
After some back and forth with it about errors from using an old version of OpenCV, we were off able to start using Github Copilot… About 15 minutes later, we had this:
import cv2
import numpy as np
import pyautogui

# Set the threshold for the non-white color
lower_bound = np.array([1,1,1])
upper_bound = np.array([254,254,254])

# Create a list to store the positions of the candidate boxes
candidate_boxes = []

# Have the user select the region of the screen to capture, show the screenshot at 50% scale
region = cv2.selectROI("Select the region to capture", cv2.resize(np.array(pyautogui.screenshot()), (0,0), fx=0.5, fy=0.5))
cv2.destroyAllWindows()

# Account for the scale of the screenshot
region = (region[0] * 2, region[1] * 2, region[2] * 2, region[3] * 2)

times_clicked = 0

while True:
    # Capture the screen
    screen = np.array(pyautogui.screenshot(region=region))

    # Threshold the screen to only select non-white color
    mask = cv2.inRange(screen, lower_bound, upper_bound)

    # Find the contours of the non-white color in the image
    contours, _ = cv2.findContours(mask, cv2.RETR_TREE, cv2.CHAIN_APPROX_SIMPLE)

    for contour in contours:
        # Find the center of the contour
        M = cv2.moments(contour)
        if M["m00"] > 0:
            cX = int(M["m10"] / M["m00"])
            cY = int(M["m01"] / M["m00"])

        # Check if the contour is already in the list of candidate boxes
        found = False
        for i, candidate in enumerate(candidate_boxes):
            if abs(candidate[0] - cX) <= 5 and abs(candidate[1] - cY) <= 5:
                found = True
                candidate_boxes[i] = (cX, cY, candidate[2] + 1)
                break

        if not found:
            candidate_boxes.append((cX, cY, 1))

    # Track if the user has clicked at least once box this iteration
    clicked = False
    for candidate in candidate_boxes:
        if candidate[2] >= 5:
            # Adjust the position of the candidate box to the center of the box accounting for the selected region
            candidate_click = (candidate[0] + region[0], candidate[1] + region[1])
            pyautogui.click(candidate_click[0], candidate_click[1])
            # remove the stationary box from the list of candidate boxes
            candidate_boxes.remove(candidate)
            clicked = True

    if clicked:
        times_clicked += 1
    # Reset the list of candidate boxes if the user has clicked 10 times
    if times_clicked >= 10:
        candidate_boxes.clear()
        times_clicked = 0
Some of the key changes are related to selecting a region on the screen instead of capturing the entire screen. We also added in an optimization that clears the candidate_boxes after a few clicks, because it was growing extremely large as we got further along in the game.
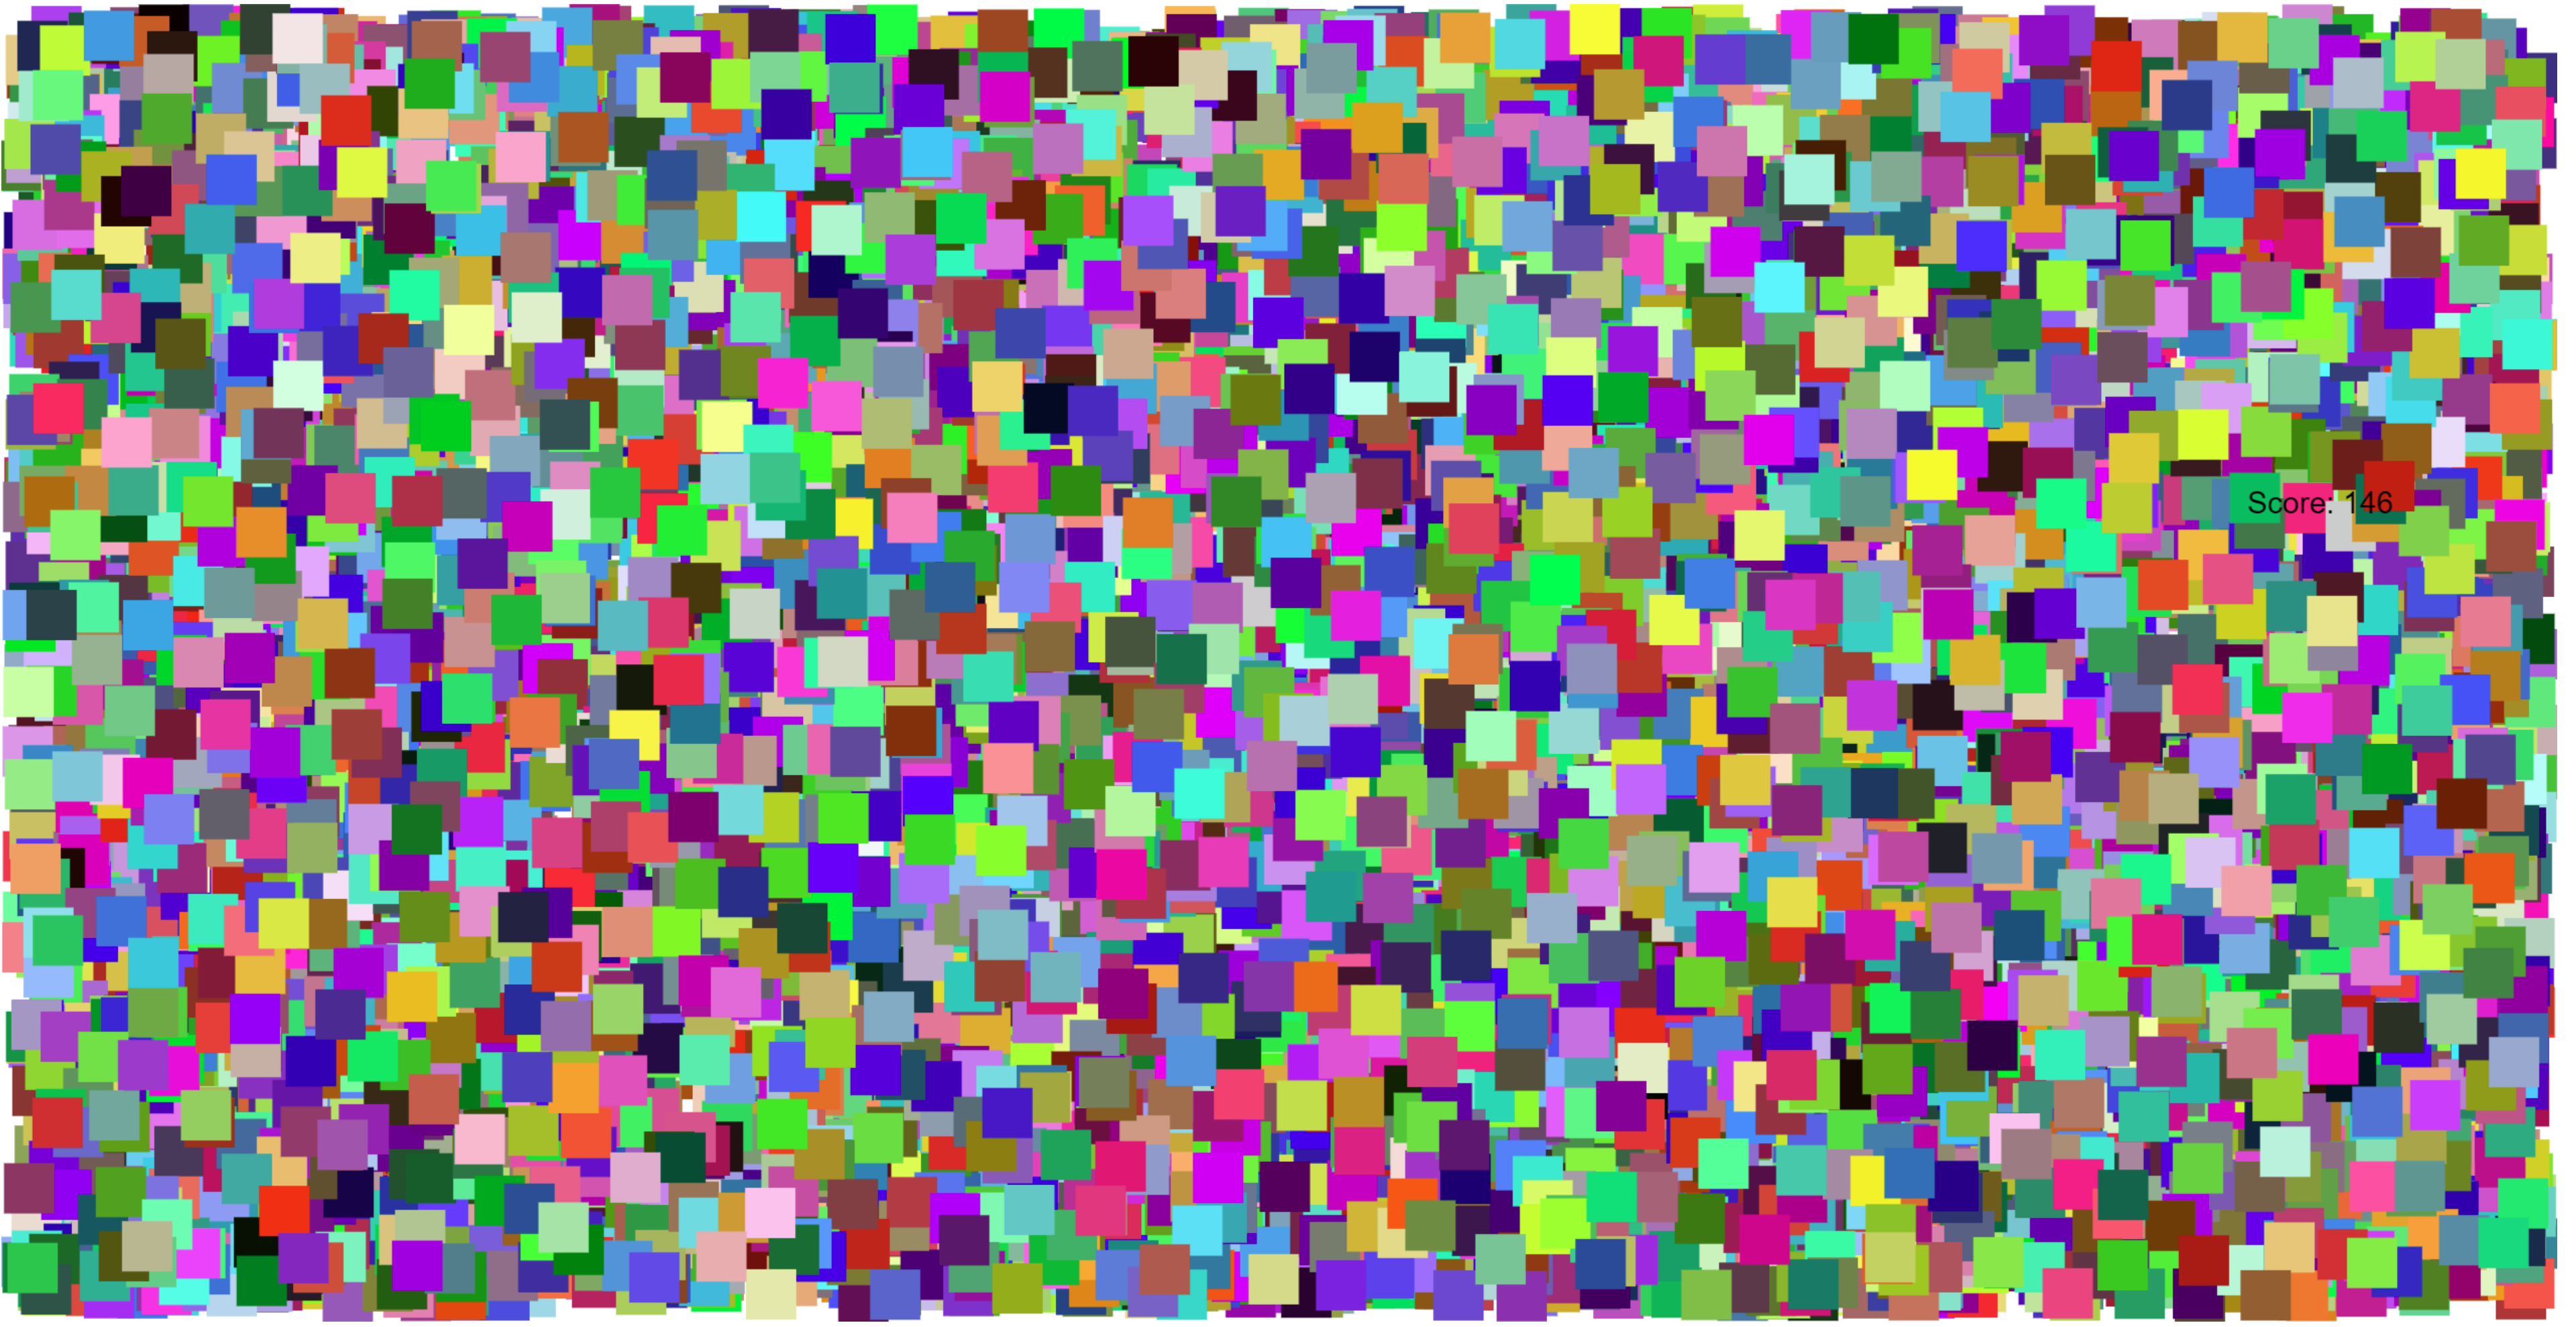
After leaving it run for a few minutes, we came back to this insanity:
The final AI code can be found here: https://github.com/Copilot-User/chatgpt-and-copilot-build-a-game/tree/main/ai
Overall, within about 30 minutes, we had a working game and an AI that uses the latest computer software to play it at a superhuman level. Welcome to the future!